Wednesday, November 15, 2023

Gluten Free and Eggless Recipes (Bread, Doughnut and Cookies)

Hello. I'm sharing 3 recipes here. Mostly to park them here in case I ever lose them, but also in case someone wants to try out gluten-free recipes for the first time and is looking for tried and tested recipes.

To skip my stories and jump to recipes, click here for bread, here for doughnuts, and here for cookies.

I haven't posted anything for almost 2 years. Last year was a bit of a challenge for me. My daughter suffered some horrid rashes on her legs and other parts of her body. When we finally did an IgE blood test, we found she had 6 allergies. It was tough. So I ended up trying a lot of gluten-free, egg-free, soy-free and nut-free recipes.

Recently, we tested again. I was hoping that her food allergies would be over after a year of abstinence. It wasn't so. But it wasn't all bad. She tested negative for egg and soy allergy so that was a relief. Her antibody levels for wheat and nuts were lower but still positive. 

So it looks like I still have to continue making gluten-free food for her. I've decided to post some here for safe-keeping and for sharing.


1. Gluten-free bread


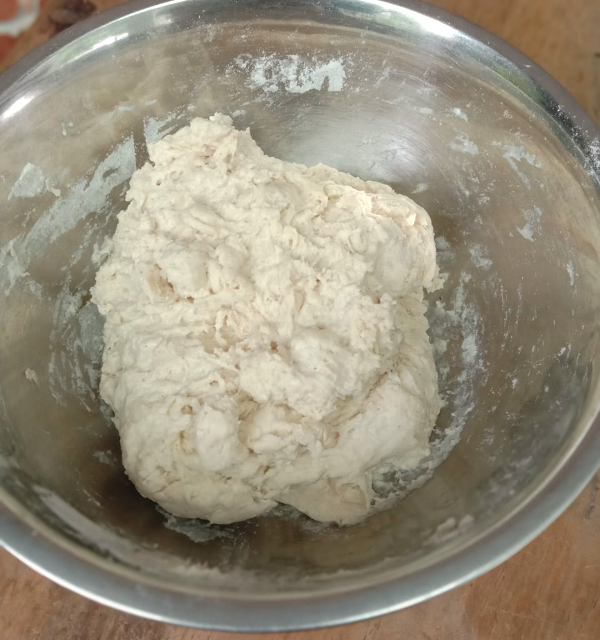
The first thing I had to try making was a gluten-free bread. Prior to this, I was making sourdough bread about twice a week. Now I had to take on a new challenge and try something different. I tried several recipes at first with epic failures. Later, I bought this magical ingredient called psyllium husk powder. It mixes with water to form a gelatinous mass and give the dough structure without gluten. Don't expect a dough like normal bread though. You'll get something like a sticky and thick batter.


You pour this batter or dough into a bread pan and you'll have to flatten the top with wet fingers. You can also use a wet metal spoon or spatula.


It may look a bit funny at this point but after proofing and baking, you'll get something that very much resembles an ordinary bread. My family members approve of this recipe and they don't find it to taste really different from the usual bread.


Here's the recipe for a Seeded Gluten-free (and vegan) bread.


2. Gluten-free doughnuts


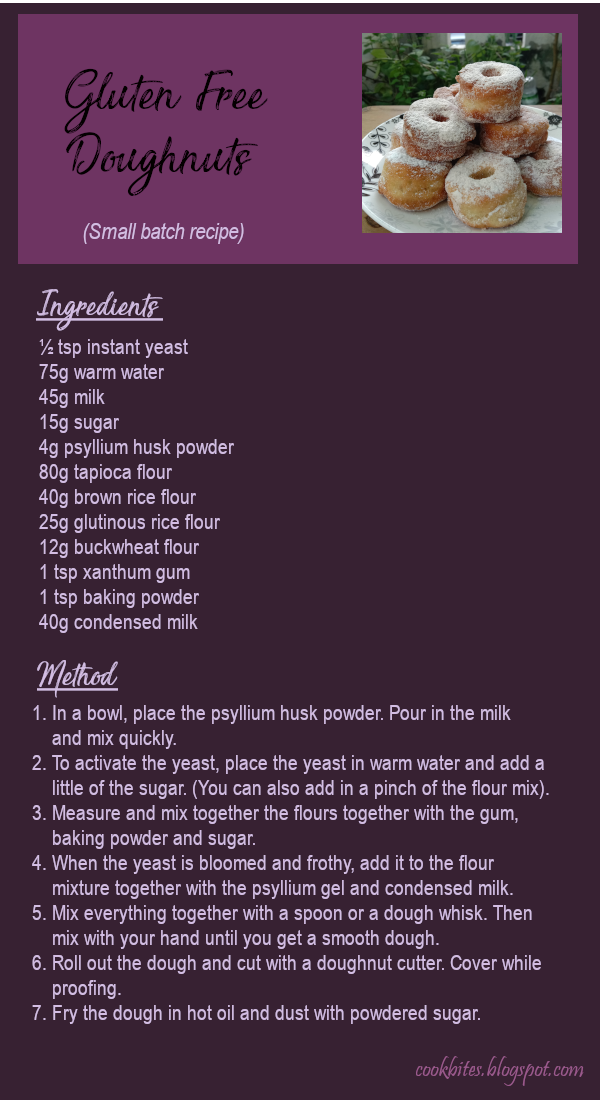
This is a good one. Most other recipes are the batter type which are baked in a doughnut molds. This one uses yeast and the doughnuts are fried rather than baked. I made these for my daughter's birthday and everyone said they were very good.


I modified the recipe from the original, as I did with the other recipes too. Here it is:


3. Gluten-free Chocolate Chip Cookies

This is THE best chocolate chip cookies. It's made without eggs, but the cookie dough is so smooth and easy to work with. Most importantly, they taste great and the family loves it.


This is a small batch recipe. You may double or triple the recipe if you want to make more.

Enjoy!


Thank you for visiting my humble blog. If you have any questions please feel free to ask me. I hope to share something again soon. Take care!

Sunday, November 28, 2021

My Basic Sourdough Bread

It's year end 2021. it's been a weird period for all of us. The pandemic has hit us since 2 years ago and we're still not seeing the end of it yet. Not that it's all bad. One thing's for sure, because of this this situation, there has been a surge in bread baking at home. And more so for sourdough breads.


There is an abundance of sourdough recipes out there, most of them are far superior than mine, I'm sure. But I'd still like to share my version of making bread. I believe it may be suitable for those who'd like a less complicated way of making sourdough bread. For example, I don't autolyse and then add in the salt and starter. I tried this. I found it to be difficult and didn't yield a better result. I don't use expensive flour. I do love using multigrain atta flour though. I usually use the Pillsbury brand. I like that it adds nutrients to my bread while keeping the dough smooth and silky.


I also bake in a hot and humid climate. So my recipe is slightly or very different from European or American ones. Having said that, there are still changes in the weather which will and can change the way the dough behaves. On rainy days, fermentation times are longer. On crazy hot days, I'd even put the dough in the fridge for an hour during the final proofing just to slow things down a bit.


When I first starting making sourdough bread, I had to familiarize myself with uncommon terminologies like autolyse, fermentolyse, hydration levels, lamination, stretch and fold, coil folds, bulk fermentation and etc. Sometimes it still gets confusing so I will not try to explain those terms.

I have a couple of advice though. One, use a sharp blade for scoring. I'm cheap (or poor) so I don't buy a fancy bread lame. I use old fashioned shaving blades and they work splendidly. Secondly, you don't need a Dutch oven if you don't have or can't afford one. Again, I use a cheap simple metal pot, the Indian kind without handles. I just put it in the oven when it's heating up and cover my dough with it during the first part of baking.


So if you managed to grow a starter from scratch and adopted one from a friend but are looking for a not difficult recipe, you may want to try this one. It's suitable for beginner level baking. Keep in mind however that sourdough baking can be unpredictable. So keep watch on how your dough develops and less on the time.

Okay, enough babbling. Here's my easy basic sourdough bread recipe...


Happy baking and Happy Christmas! To everyone who visits this blog post, I wish you all the best! Thank you!

Friday, May 8, 2020

Hong Bak

Hello everyone. It's May 2020. We will remember this time because the whole world is going through something which I may say, is unprecedented. We are in the middle of a pandemic. Most of us are staying at home and many have taken up cooking and baking, and are becoming home chefs.


Today, I'm sharing a traditional Nyonya recipe which is a little less known. It is probably because the most important ingredient, cekur, is quite hard to find. I'm only cooking this now because the cekur we planted has finally grown enough for me to harvest its roots.


I looked up the English name for this spice, and it's called "lesser galangal" or "sand ginger". The scientific name is Kaempferia galanga. I suppose you can find this root in some of the markets but I personally have not seen it sold anywhere.


The cekur, or "cekoq" as most Penangites call it, gives a distinctive fragrance and flavor to this rather unusual dish. I remember this dish as my mom made it. She also cooked it with duck (Hong Ak) which works very well, or even better than pork.


Another important ingredient is the coriander seeds. You can use coriander powder but it's best to toast whole coriander seeds and then grind them. Your nose can very clearly notice the difference.

Below is the recipe.


I can't remember where the recipe came from but I know I copied it long ago from one of my mom's collections. After more than 10 years I finally got around cooking it myself. I look forward to recreating this dish many more times. I hope you will enjoy this recipe.

I wish everyone good health and may we overcome this pandemic soon. Blessings to all!


Tuesday, December 10, 2019

Gingerbread Beer

It's that time of the year, the end of it. Next comes 2020, the year that as teenagers we thought would be a million years away. Well it's finally coming and I don't think I'm ready for it. but looking back at the year, so much has happened and I am grateful, although I'm still not ready for another year, a new decade.

You've probably heard that out of every bad situation something good comes out of it. Well, it clearly happened to me this year. It was during a gloomy situation(s) in my life that I learned to make my own sourdough starter. It happened because of the negative situation, not just in spite of it.

It was the lowest point that gave birth to my new hobby of sourdough bread making. And it was from my reading and research about sourdough that I came to know about ginger bug. I started making my own ginger bug and producing lovely fizzy probiotics drinks that the whole family enjoy.

I won't post much about making a ginger bug. It's basically just adding shredded ginger and sugar to distilled water, feeding it everyday and waiting for it to produce bubbles. It took me about 8 days before I see good signs of fermentation. It's been alive and well until today. And hopefully I can keep it alive for a long while more.


Before this, through my kitchen experiments, I found that brewing some spices with Rooibos tea produces this drink that somewhat has the hints of root beer flavours. So when I when had this ginger bug going I knew I had to try adding it to this drink.     


To me, it's a little bit like root beer. But I can't call it root beer cause it doesn't have sarsaparilla or any of the required "roots". My little girl calls it "ginger cola". I was thinking since it's almost Christmas and it has the ingredients of gingerbread, let's call it Gingerbread Beer. (By the way, I also have been baking so many gingerbread men and houses that I'm beginning to smell like it.)

Below, you can see the ingredients I used. It's pretty simple. Orange (peel only), Rooibos tea, star anise, cinnamon, and ginger. I also used blackstrap molasses for colour and flavour but I believe black treacle would work just as well.


The thing that still perplexes me is that sometimes it's foamy, sometimes it's not. At the time when I took this shot, unfortunately the drink wasn't foamy. But I didn't have time to make another batch so I just went ahead and shot it. Besides, it was still super fizzy.


So here's wishing everyone a Blessed Christmas and Happy New Year! And if you're as unexcited as I am about going through another year, maybe you should try this drink and chill back a little. Tell yourself it's gonna be okay....

If you dare to try, here's the recipe for the Gingerbread Beer. Cheers!


Sunday, September 1, 2019

Butterbeer Ice Cream

Yes! I'm finally back to my blog, the poor abandoned thing. But not forgotten though. I had so many ideas swimming in my head but never had to time to put them to work.

As usual, my posts are rather short and straight to the point, as compared to most other (proper) food blogs anyway. This post is inspired by a few subjects. First of all, this is for Harry Potter fans. Non-Potterheads would probably not know what a Butterbeer is anyway. Secondly, we actually visited the amazing Harry Potter studio when we were in London last year. We had the Buttterbeer and Butterbeer ice cream. It was magical.


Earlier this year, we even made magic wands from chopsticks and a large twig, one for each member of the family. We were so impressed with the outcome of this project. Take a look.

This year, for my 9 year old's birthday party theme, we decided on Magic and Witchcraft. It wasn't quite a Harry Potter theme but we did have a magic potions workshop which the kids enjoyed. We even printed authentic looking potions labels for the bottles.


Anyway, back to topic. We wanted to make Butterbeer for the party. We tried out the recipe and it turned out well. But I decided against it as it was too much work to make for a large group of people. I did make another batch of the the butterbeer though, and in the form of ice cream!  We finished it all before the birthday party as it was too yummy!


I used my usual method of making ice cream, which is by whipping up evaporated milk. The recipe is based on the Butterbeer drink recipe but instead of mixing the base with ice cream soda, I chilled the base and mixed in with whipped evaporated milk. I also split the sugar in two. I used half in the butter mixture and the other half whipped in the milk.


I love this recipe cause the ice cream has a soft texture and is easy to scoop straight out from the freezer. This is most likely because of the high fat content and also the small amount of alcohol.

Yes,this recipe has alcohol but the one teaspoon of rum gives a wonderful kick of flavour.
So here's the recipe if anyone is interested. But it's also for me, so that I won't forget.  Here's to magical memories. And... Expecto Patronum!!


Friday, May 18, 2018

Swirly Whirly Bread

It's great to be back. It has been an eventful week for my country. There is a new sense of patriotism in the air that you just can't miss. And while changes are happening and anticipation is high, I have decided to finally blog again after a long hiatus. 

I have been making bread rather frequently, almost weekly. No, I don't use a bread machine. I think it takes the fun out of it. Besides, as Paul Hollywood says, it takes only about five minutes to mix and knead by hand. So a good old upper body workout (or hardly) and an oven is good enough.

In this post, I'd like to share a recipe that is slightly fancier than the usual knead-wait-knead-bake method. This one is basically simple but it just looks much prettier.


It requires additional effort too since you'll have to prepare two doughs, and then roll them out, stack them, and roll 'em up.


I did find that the green wasn't as green as I hoped it would be. So next time I would use more pandan leaves for the green dough. Actually, you could just leave it plain.  But I like the smell of pandan too (other than just for the colour).


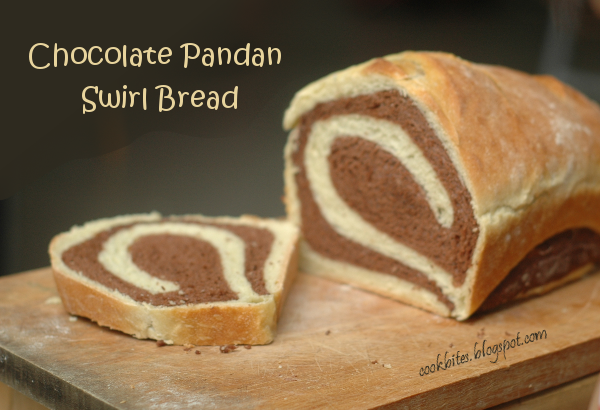
 At first glance, it looks like an ordinary loaf of homemade bread. Mine always have a strange bump in the middle. I don't know why....  Anyway, the magic is revealed only when you slice it.


Remember to let the bread cool off before cutting, especially if you have a toddler taster like mine. 
I usually take the loaf out of the tin straight after it's baked, otherwise it tends to "sweat" and gets soggy.


Chocolatey Swirly Bread.... Mmmmm. Who wants some? Recipe below:


 p.s. - For other bread recipes, you may like to try:
Black Sesame Bread
Pumpkin Bread
Cinnamon Raisin Oatmeal Bread


Saturday, July 1, 2017

An Eggless Birthday Cake

A Cake for Kayla

Our baby girl turned one recently. Yes, time flies. We had a small party for her with grandparents, auntie, uncles and cousins. I was planning what cake to make for her much in advance, for the was a tiny problem. She had bad eczema when she was a young baby. Most of it has cleared but she and I have been avoiding eggs (I avoid them too because I'm breastfeeding). Although I do plan to introduce small amounts in her diet with the intention of desensitizing her, her first birthday wasn't the time. So I tried several recipes beforehand.


Going Eggless


I pored over Pinterest, tried the condensed milk version and a few others. There were crumbly or had less than desirable taste or texture. Finally, I decided to modify my favourite chocolate cake recipe by replacing the eggs with flaxseed. The result was perfect! The cake was moist, yummy and does not fall apart easily.


So on her birtday I made this cake and iced it with pink buttercream frosting. I had extra batter since I was using two small cake tins, so I made some cupcakes with them. Emma, our eldest daughter decorated the party bags which were to be given to cousins and neighbours.


Kayla enjoyed her first cake. We let her make a mess and cleaned her up later.


So cheers to our little girl who just took her first steps yesterday. Sweet baby is also singing and talking and we're soaking up every precious moment.

Okay, okay, here's the recipe. Easy peasy.